博客
Wiki搭建
需求
- 用于记录和整理自己的知识体系
- 搭建简单,不需要服务器和数据库的支持
- 支持markdown语法
- 支持导航
- 可以版本管理
思路
- 本地修改代码push到仓库
- 仓库设置webhooks,一个链接比如 https://wiki.xxx.cn/webhooks
- 仓库在收到客户端push的请求后,会调用此链接
- nginx配置反向代理用来映射这个地址和实际处理请求的链接,比如https://wiki.xxx.cn/webhooks映射到http://127.0.0.1:10011
- pm2启动index.js,这个服务用来处理接收到push后调用webhooks.sh脚本,脚本里把代码pull到本地,然后再调用命令部署项目
注意
- 涉及到的端口要在云服务器的防火墙或安全策略组中打开
- https需要配置证书,可以去腾讯云申请一年免费证书
- nginx代理设置可以直接在配置文件或者宝塔网站管理里去设置
- 执行脚本的用户权限需要检查
- 如果是使用宝塔安装的pm2,需要注意在添加的服务项中的Module,在Module中添加依赖模块

wiki搭建有很多方式,以前用的mdwiki,由于VuePress界面清晰、简洁、扩展性好,现wiki已改为此种方式搭建。
VuePress
本地启动项目
把项目从github上下载到本地
项目在 '/xx/vuepress-master/packages/docs/docs' 目录下
进入上面目录执行下面命令就能把项目从本地跑起来了:)
安装依赖
npm install
测试部署
npm run docs:dev
正式部署
npm run docs:build
服务端部署vuepress
步骤可以看MDwiki中Webhooks设置及后面的设置。
支持数学符号
vuepress2.x 使用方法
npm i -D @vuepress/plugin-markdown-math@next 或者 npm i -D @vuepress/plugin-markdown-math@next --force

# 安装下列包之一:
npm i -D mathjax-full
npm i -D katex
.vuepress/config.ts
import { markdownMathPlugin } from '@vuepress/plugin-markdown-math'

export default {
  plugins: [
    markdownMathPlugin({
      // 选项
    }),
  ],
}
VitePress
MDwiki
第一版的wiki是参照mdwiki模板样式搭建的。
可以自己下载源码根据自己的喜好编译出来 mdwiki.html
- Install node.js >= 0.10 and npm (if not included)
- Clone the mdwiki repo
- Install deps and build MDwiki (you need automake installed - if you are on Windows check the contents of the Makefile for the list of commands to run them manually):
make
- Find the mdwiki.html in the dist/ folder
- Development For development/release use
grunt devel/release
重要文件 MDwiki.html
- 把下载文件放到服务器的指定目录,例如:
/xx/project-web/wiki/target
- mdwiki.html 可改成index.html 这样会直接访问index.md文件
导航文件 navigation.md
navigation.md文件放在mdwiki的同级目录
导航设置
# Brand name

[Menu Item 1]()

  * # SubMenu Heading 1
  * [SubMenu Item 1](subitem1.md)
  * [SubMenu Item 2](subitem2.md)
  - - - -
  * # SubMenu Heading 2
  * [SubMenu Item 3](subitem3.md)
  - - - -
  * # SubMenu Heading 3
  * [SubMenu Item 3](subitem3.md)

[Menu Item 2](item2.md)
- - - -
[Menu Item 3](item3.md)
config.json
- 用于配置标题
- 是否显示左侧快捷导航
- 设置页脚显示等
Webhooks设置
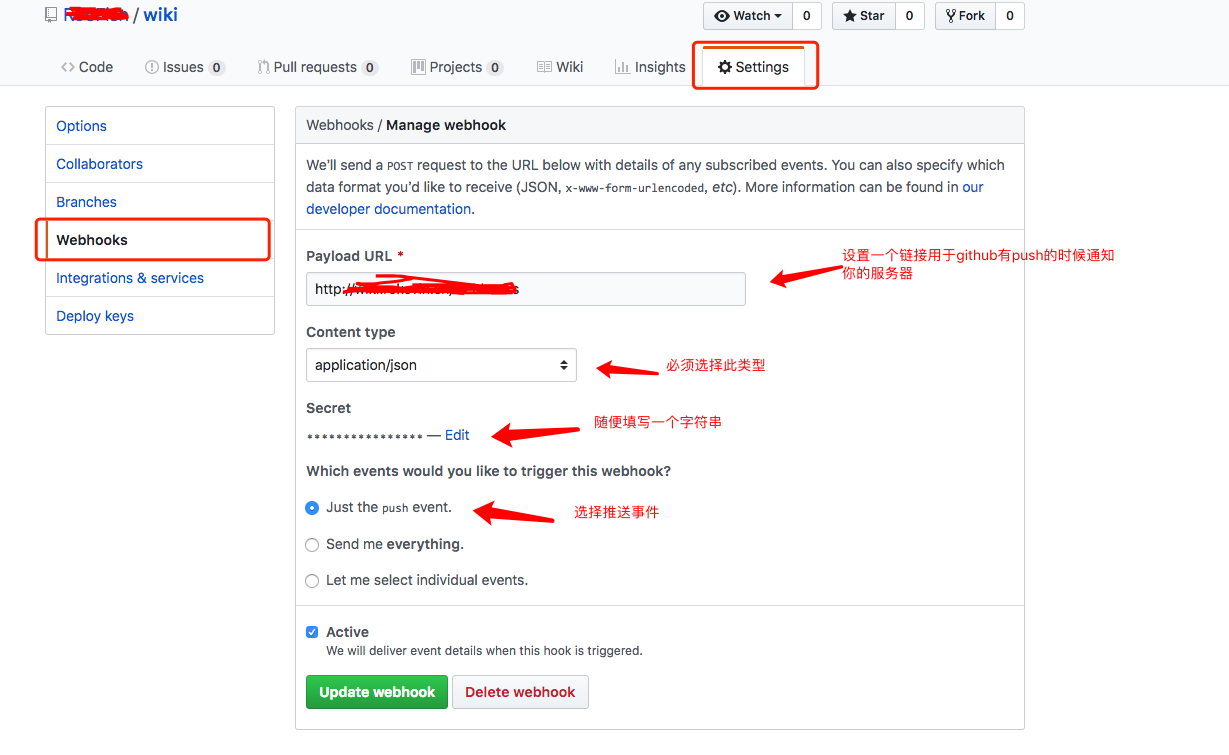
github设置webhooks
设置webhooks是为了我们编辑完文档后提交到github上就可以同步更新到服务器上
在github上创建wiki仓库
点击settings, 在左侧点击webhooks然后开始设置,如图:
Webhooks请求处理
这里没使用web容器处理webhooks请求,而是使用nodejs,然后使用pm2来管理js文件,监听webhooks过来的端口
nginx配置反向代理,指向pm2管理的js监听的端口
server {
        listen 80;
        server_name wiki.xxx.cn;

        location /webhooks {
                proxy_pass http://127.0.0.1:10011;
        }

        location / {
                root /xx/project-web/wiki/target;
        }

        location /css {
                root /xx/project-web/wiki/target;
        }

        location /js {
                root /xx/project-web/wiki/target;
        }

        location /images {
                root /xx/project-web/wiki/target;
        }

        location /html {
                root /xx/project-web/wiki/target;
        }

        location = /index.html {
                root /xx/project-web/wiki/target;
        }
}
node安装
使用包管理器安装
curl --silent --location https://rpm.nodesource.com/setup_8.x | sudo bash -

sudo yum -y install nodejs
PM2安装
npm install -g pm2
处理Webhook
github-webhook-handler
新建个index.js文件,将下面内容拷入index.js中
var http = require('http')
var createHandler = require('github-webhook-handler')
// path: 是在github上设置webhooks的资源地址
// secret: 在webhooks中添加的值
var handler = createHandler({ path: '/webhooks', secret: 'test' })

function run_cmd(cmd, args, callback) {
  var spawn = require('child_process').spawn;
  var child = spawn(cmd, args);
  var resp = "";

  child.stdout.on('data', function(buffer) { resp += buffer.toString(); });
  child.stdout.on('end', function() { callback (resp) });
}

http.createServer(function (req, res) {
  handler(req, res, function (err) {
    res.statusCode = 404
    res.end('no such location')
  })
}).listen(10011) // 此端口是nginx配置反向代理监听的端口

handler.on('error', function (err) {
  console.error('Error:', err.message)
})

handler.on('push', function (event) {
  console.log('Received a push event for %s to %s',
    event.payload.repository.name,
    event.payload.ref)
    run_cmd('sh', ['./webhooks.sh',event.payload.repository.name], function(text){ console.log(text) });

})

handler.on('issues', function (event) {
  console.log('Received an issue event for %s action=%s: #%d %s',
    event.payload.repository.name,
    event.payload.action,
    event.payload.issue.number,
    event.payload.issue.title)
})
把服务器用ssh生成的公钥配置到github中的deploy keys中
把自己的wiki项目clone到本地
webhooks.sh脚本
cd /www/wwwroot/wiki.xxxx.cn/wiki/ && git pull && npm run docs:build
执行
pm2 start index.js
这样你在本地提交完并push后,服务器那边会自动就更新了:)
Dokuwiki
gollum
介绍
gollum是一个基于git的,解析markdown文件的wiki系统
搭建
- gollum是基于ruby编写的,所以在安装gollum之前,需要先安装ruby环境。安装依赖包 gollum依赖的包还是蛮多的,包括了ruby ,ruby-devel ,git 等等,看自己服务器的情况增加依赖包。ruby版本建议在2.0+,git最好用最新版吧。
yum -y install ruby ruby-devel rubygems make gcc libxml2-devel libxslt-devel git libicu-devel
- 安装gollum
gem install gollum
注意:建议安装 Rugged,这个是gollum所需要的git adapter ,默认的git adapter 是grit,但实际在用这个适配器的时候,会发现这个适配器不支持中文文件名、目录的问题,使用 rugged是没有问题的,能解决
中文目录/文件名问题解决。
- 安装Rugged
gem install gollum-rugged_adapter
- 在启动的时候,加上参数:
--adapter rugged
启动
gollum是与git配合使用的,所以gollum的命令也要在git目录下才能启动;
gollum --port 4567 --adapter rugged --no-edit --base-path /wiki
gollum --port 4568 --adapter rugged --no-edit
退出
ps -ef | grep gollum | grep -v grep | awk '{print $2}'
kill -p  pid  #上个命令会输出pid
Hexo
npm install hexo-cli -g
hexo init blog
cd blog
npm install
hexo server